Monday, July 30, 2018

Early Electric Singer Sewing Tables (revision 2)

Changes in early electric Singer Tables (revision 2)

It's been an adventure. My first post on the type 40 showed four specific variations and as time went by and more evidence arrived... it appears as though there were indeed five distinct versions. I did write a short addendum on the first post putting forth the proposition that there may be a fifth, but one single cabinet didn't make it so in my book. Then I happened upon a second, and a third. Oh by golly, it's a revolution!

Re-numbered type 40 Library Table variations:


V1. The first version remains the first,
a short-lived 1920 to 1921 model with foot rest.
Middle split top w/right hand drop down leaf
3 drawers (One pull-out, one drop down, one oil can shelf)
2 leg crossbars and pyramid medallions on front legs

Resources for information on these early type 40s is scant. The theory that I've been running with is that Singer probably did not design a cabinet specifically for an electric-only machine... unless they planned on offering an electric only machine. It would seem odd for a company to design something they weren't planning to use. The history of the first offerings of Singer electric machines is also difficult to pin down. From all appearances Singer had the 101 model in the works and the type 40 was going to be the new 'electric only' cabinet.


Western Electric had already been selling electric home machines in the 19 teens with limited success. So Singer did have a resource to imitate.  Singer also offered the 'electric motor kit' in 1920 allowing conversions of previously sold treadle or crank machines over to the new power source. The kit had specific instructions on where and how to drill and thread a hole in the cast iron to accept the bolt that would hold the motor and bracket.


This advertisement above in particular seems to suggest what I believed all along: that the type 40 had been designed for the 101 exclusively and they both were to be introduced in 1920 as the new high-end, electric-only, top of the line sewing machine in the new "Singer 101 Electric cabinet".


Meanwhile, the 'electrification' kits for outside mounted motors and public demand for electrified machines lead Singer to change the casting (addition of motor bosses) in many other Singer models sometime in late 1920.  It appears as if there were two specific lines of development happening concurrently. One was the planned introduction of the potted motor 101... and the second was the more organic (and unplanned) adaptation of the exterior mounted motor assembly.
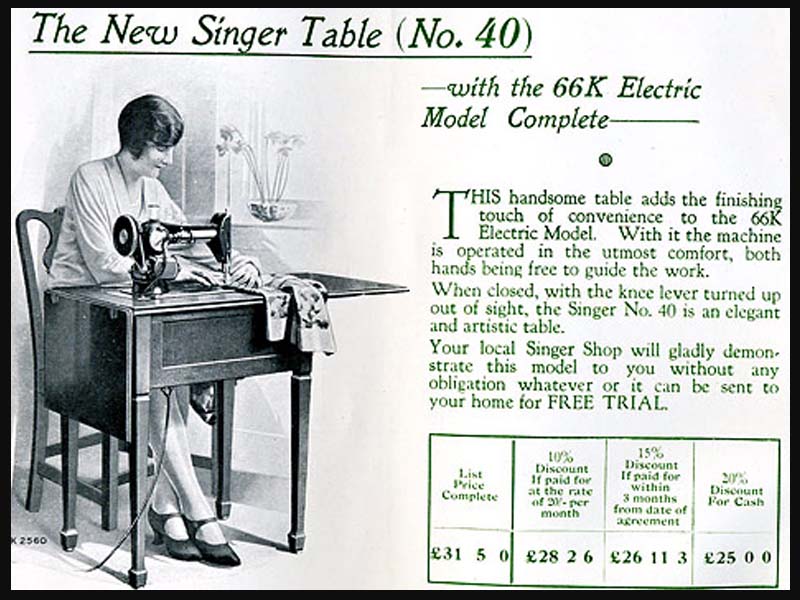

Some sources say the first electric cabinet (type 40) was indeed sold in 1920, but that it housed a model 66... other references have the type 40 first being sold in 1918... which makes no sense at all since Singer didn't have an electric machine to offer the domestic market in 1918. The other thing that I need to keep in mind is that the timing of products being offered to the public may have been different between the US the UK, and else where in the world. The model 101 was never offered anywhere else but here in North America - again, adding to confusion.

I have yet to find an example of a model 66 with a casting date of 1920 in an original version type 40 Library table, and I have seen two correctly dated 101's in such a cabinet.  This is not to say that another one of Singer's other models wasn't sold in the first version of the type 40. It's entirely possible that it happened, but available evidence does not indicate that such a combination was planned by Singer. Adaptation and invention of exterior mounted motors seems to have taken all the wind out of the sails when it came to the introduction of the potted motor, electric-only model 101 - the first mass-produced and specifically designed all-electric domestic sewing machine.


V2 Circa 1921 to 1923
No footrest.   
Middle split top w/right hand drop down leaf
3 drawers (One pull-out, one drop down, one oil can shelf)
3 leg crossbars and pyramid medallions on front legs


V3 *new distinctions: 1925 to early 1927
Middle split w/one drop down leaf 
No three 'doors' on the front - just one wider pull down drawer. 
No crossbars between the legs
Pyramid medallions on front legs.


V4 1927 - to early1930
Middle split w/one drop down leaf 
One pull down drawer
Change in leg design* - a detail that had previously escaped me.
No crossbars or medallions on legs


About those legs... it appears as though the decorative cut in the legs was changed - this is just below where the medallions had been placed on the front, but the cut is inclusive of the back legs as well. Sometime between 1927 and 1930 the carved flair is changed. Prior to 1930 this flair was a single swipe of the lathe, and then sometime after 1930 the flair became formed by a double swipe. There are probably far more technical terms for this little detail... and if you know what they are, please share. =)


V5 late 1930 to 1957
Off-center split - right leaf remains horizontal
One pull down drawer
No crossbars or medallions on legs
Double cut flair to leg knees

The Queen Anne Variation

I should make room for the QA. The 'Queen Anne' table is often noted as being it's own variation of the type 40. Nomenclature of the times refers to the table as "Type 40 (Queen Anne). I had thought for a long time that the Queen Anne was introduced in 1939 with the new Singer 201, but it appears as though perhaps the table was around way before that.


I'll go out a limb here because I've only seen one of these and will probably see more as I did with the type 40 variation... but this is a Queen Anne with a center split top and drop down right hand leaf. This would suggest... that the QA may have been in production prior to 1932.  I'd like to see more evidence, but I can't rule it out.


V7. The usual Queen Anne table with 75/25 split.

Early Singer Combination Tables.

Again, there seems to be different variations of the early combination table. One may have a simple one-piece insert that fills the empty space where the machine would sit so that the table can be used as a table and then there's a second version has a three piece hinged insert that is not removable but folds in such a way to allow a machine to be rolled up into place.


Variation 1: for the portable

The insert space on one combination table may be large enough to accept the lower half of a portable case,  where on another table the machine is bolted in and flips down like a more 'normal' electric cabinet. Some were built specifically for use with a portable machine and foot pedal, others yet have a built-in knee control with wiring systems similar to those on the early type 40's.  Some combos had a single pull out drawer, some had a hinged door, and others yet appear to have had no drawer at all.


All of these wooden early versions date back into the 1920's and typically seem to use the same wooden leg design as the type 40 Library table.  They seem to be the same height and depth, but are wider.


If you search through some of the online sites documenting historical changes in the Singer line, ISMACS and Needlebar do not exactly agree with each other. It may be that Singer introduced specific changes in the cabinets here in the US, and then made changes to them before going to Europe.


Variation 2: built in machine.

For example, when Needlebar shows a type 40 Deluxe Library Table as "E01" (Electric cabinet 1) the table pictured is the second variation of the type 40, not the first, and they show it housing a model 66... whereas the first electric available here was the potted motor 101 in 1920 in the first variation of the type 40 table (not the second), followed by different models with exterior mounted belt driven motors in 1921.


The Combination tables listed by Needlebar begin with the model 301 and proceed numerically to 307. Differences in individual exterior design are not noted, but the specific machine model number to table model number match are recorded as the following:

301 - for 99 and 128 machine models.
302 - for 15, 66, 115, 127 models (with knee control)
303 - for 15, 66, 115, 127, and 201 models
304 - for 101-12 models
305 - for 15-60, 66-6 & 127-13 models (with knee control)
306 - for 15-87, 15-90, 66-6, 101-4 & 127-13 models (with knee control)
307 - for 24 and 68 models

Of all of the above models significant visual design difference are shown in the 305 & 306. The 305 appears to have had taller front, back, and side panels than any of the other combo tables, and the 306 appears to be the only model without a drawer.

ISMACS list of Singer Combination tables lists only the following:
301 - 99, 128
304 - 101

It is also interesting to note the curvature of the knee controller. The same two piece 'hook' style of controller is found in many of the early type 40 cabinets which eventually gave way to a nearly straight single piece lever.


Variation 3: Built in machine with side drawer.


Changes in design of the "Combination Table" line of tables begin sometime around 1925 where you see the single pull out drawer removed and in it's place comes a side drawer with spool spindles.

*again, these are only my observations. The truth may be out there. Consider this a work in progress. =)

Comments and Corrections are very welcome.


Friday, July 20, 2018

Passion? Or abberant behavior...

I hate to put any fine chips in the finish, but there are times when sewing machine restoration isn't all that glamorous. (No! tell me it's not true!) There's not always some crazy road-trip miss-adventure into the great unknown or mysterious machine appearing in the driveway overnight. There are quiet weeks, times when the heat and humidity make you think twice about visiting the workshop. Days when the work you really need to get done is so mundane that's it's difficult to stay thrilled.

I made a challenge for myself to begin in one corner and clean and fix all the little things that I've put off.  The result has left me very satisfied on one hand, but it meant some rather quiet and monotonous hours.


Sometimes a picture is worth a thousand words.


I suppose it wouldn't have been so bad if there hadn't been two of them! Two Kenmore footballs: a 117.580 and 581. Each needing a complete cleaning. The crinkle finish is lovely and durable and really neat in the light gray... and very darn annoying to clean. It really did involve a lot of time with a bucket of cleanser and a toothbrush.

The second machine gave me fits when it came to amount of gunk inside the presser foot spring bar area.  The black bar that should move up and down against the presser foot lever is supposed to move! This one didn't. Two nights of an oil soak and in the end I still needed a small tack hammer to get it out of the spot it had glued itself into.

Cleaning does make maintenance and repair seem way more exciting, fun, and interesting.


This 1930 Singer 101 (V4 type 40) was far too slow. I had already cleaned and oiled the machine once and it still wasn't what I had in mind. A thousand stitch-a-minute machine should sew a lot quicker than it was doing. I ended up with the motor service instructions from the owner's manual... pulled the motor out and cleaned and re-greased all the proper points. Amazing that they believed the owner would do this twice a year! Speed increased, sound decreased, but it still wasn't enough. The ceramic controller on this one may be on it's way out since a change in control mechanisms made all the difference. I bypassed the knee control and subbed in a foot pedal, and away it went. Now, it's almost too fast.

Then there was one where just the very act of cleaning tested me.


This 40's Singer model 66 wasn't a recent arrival, more important things had leaped ahead of it. The motor turned, the mechs spun, the wiring looked fine. A short test a while back saw that the light glowed and the motor sounded good, and off into the corner it went. Little did I know...


That's an amazing amount of lint.
I've never seen a front end packed like this...
Suddenly this little 66 is a superstar.

Everything else about the machine was pretty normal except for that same old moral question. Antique sewing machines are so different than many other antiques in that people want to use them. The thing with many collectors is having a fully operational machine so that the fun comes from sewing with one and then another.  There's a certain pleasure learning the subtle differences and controls.

For a machine to purr along and manipulate a thin little thread as it was designed... all the pathways must be clean and free of any debris. This often means having to remove very specific areas of wonderful aged patina. That's always a hard call. I left a little more than usual on this 66.


The underside of the presser foot is spotless because it will be in touch with new material. The thin edges are clean, but I left the dull haze on top that's taken 70 years to form. I did the same with areas on on the needle and foot bar.


The pillar behind the motor is spotless to limit motor-killing dust, but I left the age on the inspection panel. I'm happy with this overall look; a delicate balance between function and decades of acquired character.


It does make me wonder though. I know it's just me in some regard. I'm the one that 'has to' make sure all the working bits are clean and perfect. I'm the one that wants the machine to present well, and I'm the one taking all the time. It's either a passion to recover these nearly lost pieces of history... or some sort of O-c-d driven personality quirk.  There is a certain redundancy to it that concerns me. I need to mix things up more, change it up, stay out of a rut...

Some disappointing news on the Adler front:


Yep. That is what's left of the timing belt. Try as I might I have yet been able to find the part number online. The machine is model 453a circa 1955... and I am still digging through websites (mostly in German) to see if I can find a replacement. It's going to be interesting when I find one, because that means having to time a 60 plus year old machine without any written clue as to what I'm doing. Ah; back to the great unknown!


Next post 'may' be a redo of the Model 40 DeLuxe library Table.

I've had to re-number the versions, and add a few clarifications.


Saturday, July 7, 2018

Bam-bam and Waiting for Zane

I thought that I might get a little break as I waited for that much anticipated phone call. I feel like one of those TV Picker guys. Every time I try to imagine 'hundreds of sewing machines'  my excitement level goes up, my pulse quickens, and patience seems a tad scarce. This is the hard part, the waiting.

To take my mind off things, I went back down into the garage and began a simple re-poly on the Lady Kenmore cabinet. The original finish was just rolling off. I could rub the old finish away with my fingernail - that's how brittle it was.  Fortunately the entire cabinet is very close to the same color and many panels seem perfectly fine, so the fix here isn't going to be a major re-do. A little bit of sanding, a rub down with the 4-ought steel wool and then a tack cloth and a couple of poly coats until the amber matches.


I made the mistake of looking at CL and found another Lady K that was not running. I couldn't help myself. The price was crazy reasonable for a non-functioning machine. So now I have a spare. I like this. Sewing with a fifty plus year old machine is a lot of fun, but having to find parts isn't. Having one in reserve is perfect.


When I brought it home the hand wheel refused to do a full turn in either direction. The strange thing is that when the wheel began to bind, it didn't feel hard. The bind, whatever it was, had some give to it. My first thought was that perhaps somewhere along the line some thread had made it to where it shouldn't be and that never mixes well with the usual German tolerances.

Everything was fine in the front and the feed dogs were clear. The bobbin case had a bobbin half full of thread and the other half was wound all over the insides. It took a few minutes to dislodge every trace of blue thread. Once I finished, I lowered the machine without a bobbin or carrier and wouldn't you know the wheel did a full rotation. It was time for some oil drops and a check of the wiring, and then power, and away she went. Within the hour it was back up and running and sewing. The only difference between this model 89 and the other one came down to the date of manufacture. This one is a 1958 model while the first is a '59. Other than that, they're identical.


Then came a visit to The Sewing Machine Lady. I needed a few new parts (which she always has) and she handed me some old Kenmore stuff she didn't have any use for. Had the opportunity to see an ancient Howe treadle and a Wilcox & Gibbs, both of which still work and could be museum pieces!

I wish I knew how the magic works, I swear, sometimes it's just plan weird. Among the Kenmore things was a manual for a model 52 and a box of the double sided orange cams. Little did any of us know that I might need them the very next day.

A request came in wondering if I might have an older, solid, durable, steel machine for a very energetic teen learning to sew. The young man is sewing hockey jerseys and apparently he's been a little too rough on Mom's machine.


A quick glance through the stack of available machine heads and wouldn't you know...  I just so happened to have a Kenmore 158.525 sitting in the garage without a pedal. It's solid steel through and through and it runs and sews wonderfully. I added the owner's manual and cam set that Kathy gave me... and cleaned up a fantastic solid-wood table with matching chair.  It also has a Kenmore ID plate, but I've never seen one like this:


How perfect is this? An all-steel machine with straight stitch, zigzag, back tack, decorative cams, double needle and free sewing capable... with a built in 4-step button hole option in a heavy duty chuck of solid wood cabinet? No plastic, no veneer! And I have the owner's manual and the attachment box with 7 cams. Wouldn't you think this is about as teenager proof as it gets!

It made me work. It's been serviced and oiled, and oiled again. I've scoured the bobbin area for every speck of dust. I didn't like the wear spots on the power cord, so those have been replaced. The motor sparked a tad too much, so I tore it down, cleaned out all the carbon dust and put a shine to the armature. I went through all the cams to make sure the mechs worked the way they should and I cleaned and polished everything twice. The noise level has dropped, the machine runs crazy smooth, and I think I've done everything I can to give a young sewer a good learning experience.

I think it's great to learn to sew on a machine like this, Everything is out in the open, visible, no computer programing needed and you have to care for it. A powerful lesson on all accounts. If the table and chair were to be here another day, I would have had them sanded down and re-finished. There's a few glaring blemishes. But all-in-all the whole thing makes me smile. I've nick-named it Bam-bam. It must be the bone-like wood trim?

The only question I have is... How on earth do all of these things know to come together this way? A machine from McKee's Rocks, a cabinet from Irwin, and a manual and cam set from Zelie! Or is this just one of those things that I shouldn't question. I feel like some cosmic conduit. The needed thing over here must be moved to over there... and I'm just the clueless delivery guy.

However it works, I'm happy to have it. We'll make the best of it.

The other machine to be on the bench soon is thanks again to Greg and I never saw this coming. Where does he find these things? Or maybe I should be asking how do these things find Greg? It's just amazing. This machine is an Adler. That's right, the same company that builds those high-end commercial machines. Apparently they offered a scant few models for home use. This is the harder to find model 453.


It appears to be all there with attachments and owner's manual. I'm guessing from the look of it that it desperately needs a good cleaning and servicing. A domestic-use Adler machine... omg. How fantastic is this? This could be a show piece. It's probably a work horse, probably as durable as they come - because that's what Adler makes. This could make a sewing room super special. I'm going to have to be very careful and pull out all the stops. It needs to be a show-stopper.

So yes, I have things to do and they're important and special and fun... but it's still there in the back of my mind.

I'm waiting for the man to call and say he's found the time to show us all those machines and parts from a dealership that began in 1951.  It's a daydream come true and the wait is just driving me crazy.

Tuesday, June 26, 2018

Edith Cabinet Finished

Sometimes it's easy to sand down a surface or two and then rub things down with steel wool and a couple of poly coats later the piece looks great... this was not one of those times.


The Domestic cabinet was very much like an old singer type 41 that I redid a year and a half ago. The top surface had a veneer which was darker than anything else on the cabinet. I sanded it down, decided to try and save it even with the occasional scar, and then I clear coated it twice. That's it. I didn't need to get any darker because it literally set the tone for the rest of the cabinet. All the other pieces would have to become that color.


The sewing surface woods were different from left half to right half. The left had a very similar veneer as the top which matched the outside side panels and the front. These all got the very light colorless treatment.


The right side, or machine side however, was not a veneer, nor were the edges, corner upright pieces, or spindles. Each set of these were a different wood, and a different color.

To darken the machine side of the sewing surface I started out with a light Walnut coat, then steel wool, and then a light red mahogany. After that dried and was scrubbed with the wool, the color was almost close enough, and it finally came together with two coats of gloss poly.

The crack under the one hinge took very well to the wood glue and although it may not hold forever, using the door as the leaf prop the way it is designed should save the piece from further damage.  The door itself had many other issues. Since it's supposed to be open when using the machine, I had to address each one. The trays and the spool holder had begun to rust and they were removed and sanded down. I had to tape off each spindle, but the results were worth the effort.


Even with the wood finished, and the trays redone, it threw one more obstacle. The door was not closing properly. The small ball-bearing like bead in the frame of the door is supposed to pop into a little metal cup. It was a half inch off.  Upon close inspection I realized the top hinge was not set properly and it was removed and taken to the bench vice to flatten out the cupping. I've never seen a hinge do that before! With the plate flat and set flush, the door closed and the bead hit the cup. It's still a quarter of an inch from perfect, but I'm delighted with the results.


The square like cabinet edges got a very similar treatment as the sewing surface except they took two coats of the walnut, then the mahogany, and then the clear. The spindles were one coat each before the poly coats. It was a challenge with the brush when it came to applying each coat. One surface would just need a light wash, while another wood would need a thicker layer of color.


To be honest, I'm amazed at all of the results: the machine, the cabinet, everything. I never would have thought that lying just under all those very weathered surfaces was such a magnificent machine and cabinet. I'm gathering up the attachments, box, oil can, bobbins and perhaps some old wooden thread spools and a pair of scissors. I think that no matter how much sewing Edith does in the future, she's going to present really well for years to come.


I've had this thought... that perhaps I should return her now. Take her back to the house she came from. The home is being refurbished from the ground up and the gentleman doing the work is trying to incorporate every little original piece he can use. Perhaps Edith would be welcome - a visual reminder of what he wants to accomplish on a much grander scale. =)

My next post may be a week or two out. There's this opportunity I have to visit with a person who has "hundreds" of older sewing machines and parts on top of parts. Sure, there may be something else I could do before that happens, but it may be worth the wait.

Be well until then!

Monday, June 18, 2018

Edith's Cabinet part 1

1938 wasn't the best year. 

Although there had been advances with the economy since FDR began the New Deal... for reasons historians consider 'natural cycles' 1937 through 1938 saw a recession dip.  Unemployment was up, and the business sector blamed Roosevelt, and to make matters worse there were hints of war from Europe.

The 'Domestic' sewing machine was first produced in 1869.  It was an independent company from Buffalo, New York until the 1920's when White Manufacturing of Cleveland purchased them in 1924. I can only imagine the times and the calamity of '38 when Edith and her cabinet were produced and sold. It's almost paradoxical to have bought a sewing machine in that year. One would have had to have a great deal of optimism in very uncertain times.

The machine and cabinet were made and combined in White's third Cleveland factory located on Main and Elm streets.  Although the cabinet with turned lower legs and a swinging door is very common for the period. I can 'almost' identify the White style at a glance. They just have a 'look' about them.


Edith's cabinet is certainly curious.


(after considerable sanding)

There are a lot of subtle details that make restoring this piece a more time-consuming than others. The first, of course, are the turned legs. Without having access to a lathe I find myself sanding it by hand and each turn creates  more fine detail work.


I've learned to take a sheet of sand paper, flip it over, and then add a layer of duct tape across the back. Once I've done this then I cut out a long strip of sand paper about a quarter of an inch wide. The tape backing keeps the paper from wearing out too quickly and snapping as I pull it back and forth around the spindle details.


Occasionally, even this small width isn't sharp enough 
and I'll twist the sandpaper into a long thin tube for finer areas.


The sewing area:


The sewing deck finish is coming off far more easily on the sewing machine side while the leaf side is taking more effort. Normal sand paper cleaned off the machine side, and it just wasn't working at all on the left leaf side. I  spent an hour with sand paper and managed maybe a third of the area. At that time I gave up and went back to the trusted piece of glass. Scraping with the glass piece must be done with great attention so to not dig into the wood or your fingers... and to avoid polishing. It took a half an hour to clear the other two-thirds with the glass.


All around the cabinet are more details that need to be dealt with a sharp folded edge of sandpaper. Whether it's the bevel on the sewing deck edge and it's two tiers... or the three distinct lines of the raised front panel... 
or the curved scroll work.


One other trick, besides the tape-backed sandpaper strips or the glass shard, or having to roll small sandpaper strips loosely to slowly sand the fluted bits... I've also learned to keep my Linseed oil rag at the handy. I'm not oiling the wood to crate a finish. The rag has residual oil in the material and I'll rub it across an area that I've been sanding and wait for the oils to 'show' me where I've missed paint or finish.


This cabinet won't be ready in a hurry, and yet it is exactly those time-consuming details that make it such an attractive piece to recover.  I do often wonder why I do it. Wasn't it Einstien that defined insanity as doing the same thing over and over again and getting the same results. Here, again, I'll have a lot of hours in refinishing... and chances are no one will want the machine.


During the sanding I found a problem. The White cabinets of this era are slightly unusual in that they have a cable assisted lifting mechanism that helps lower and raise the machine. When the lid is up and the machine is out this cable also serves as the anchor which keeps the single left leaf horizontal. The cable, however, does this on the 'back' of the sewing surface which leaves the front hanging. The only thing keeping the leaf upright in the front is the cut of the edge of the leaf wedged against the edge of the sewing surface wood - unless you open the front door and slip it's edge under the leaf. Since the cable and the two hinges keep everything taunt, there shouldn't be an issue... but in the photo above, you can see that the wood has cracked under the front hinge. The stress also transmitted into the wood on the outside as seen below:


I'm going to have to remove the leaf entirely and see if this can be repaired, there is a slight warp in the hinge. I'll remove it and straighten it and then slip some wood glue into the crack and clamp it. If this isn't enough of a repair, then I may have to get out the big guns and perhaps drill a hole and insert a piece of dowel or a cut a butterfly. It will depend on the depth and extent of the fissure.


The other repair that may be needed is the laminate for the top. 
This one one is mostly there, but there are chips, and the surface has a lot of discoloration.

In the end I hope to have a nice cabinet, but even as I worked on it through National Sewing Machine Day I suspect that even if the cabinet and machine become an attractive and functioning piece... it is perhaps for not. There are probably a lot of other things I could be doing with my spare time that might be more adventurous, lucrative, or rewarding, and yet I do enjoy this work and always learn something new with each project.


Here's a photo of the unusual bobbin for this machine.
This is the White Rotary bobbin case number 836.
It's not an easy piece to find, and yet I have to find another one
because it's the same exact bobbin case that the Franklin Rotary 
sitting on the bench will need when it becomes the next machine project.