Tuesday, February 27, 2018

Anne of the Green Novas: status report.


The update on Anne reads a little like a Victorian novel. It’s good, then it’s bad, then it’s good… and so it goes. The mechanics are all loose and rolling and feel exactly like they should feel. The balance wheel wants to turn, and when it does everything follows right along. Amazing what being bathed, well fed, and getting a good night’s sleep can do – even for a sewing machine.


The wiring had looked suspect from day one and I thought now would be the time to inspect it. There’s a splice near the plug end, a significant chunk of Bakelite missing in the Mercury (junction) box, and what appeared to be another splice near the motor. It was this last one that concerned me the most so I began to unravel the tape. 


I should have known. No really, I should have known. This era of Necchi machines seem to have a thing about losing wiring insulation. I can’t tell you how many times I’ve seen or heard ‘had to rewire the motor’ because of the crumbling outer cover on the wiring. So I shouldn’t have been surprised when there wasn’t a splice at all underneath all that tape, but instead…  the tape had been wrapped around each individual wire strand of the original wiring in an effort to keep the leads from touching. As you can see, bare wires are peeking out of the entrance to the motor.


Here we have yet another reminder to always check the wiring on a vintage sewing machine before plugging it in, and a fair warning to anyone interested in acquiring a Necchi from this era: double check the wires, expect to find issues, don't give up, it can be fixed.  I’m going to look at this as an opportunity and hope to be able to present a step by step illustrated set of instructions on how to rewire your old Necchi, and I’m already getting things prepared. Here we go again, just like the BU.

On another front, Anne’s home is coming along nicely. She came with this short and somewhat attractive right-pedestal sewing desk in an art deco motif. I have checked everywhere and cannot find a manufacturer’s mark. Anne had been fitted with a Singer foot pedal and this desk does have the mount for that pedal, but there is no knee control.


The desk was bathed with Murphy’s oil soap, allowed to dry, then rubbed down once with boiled linseed oil. After that seeped and dried, I began with the paste wax. The bottom drawer needs a replacement runner, and all the drawer edges need a good soap rubbing. The only thing that has me  beat is restoring the Bakelite insert pieces for the handles. 


Here’s a pic showing the top piece after being cleaned, while the bottom insert is as I found them all: nearly white. The problem is that the material used here is thin walled, hollow, and was originally opaque. I may eventually sub them out for another material, but only because I really do like this desk.  


More updates to come, and hopefully an entire tutorial.

Saturday, February 24, 2018

Stalking the Elusive Nova

The Nova. The one-year only 1953 improved Necchi BU. I'm sure that there are places in the world where they are so numerous that they run in packs, but here, in the backwoods of Pennsyltucky they are very few.  Blame it on sub-urbanization, or a decline of natural habitat, or eroding feeding grounds, the fact remains that the population of local Novas has been in decline.  

I have hunted them. Stalked the Nova in it's natural environment and have always come up short. Today however, there were fresh tracks on wet ground. 

We left camp shortly before Oh-eight-hundred and climbed Snake Hill summit hoping to make Avella by mid-day. The going was slow due to heavy ground saturated with spring rains. Once, if not twice, in between peaks we thought we might lose its trail with the in-and-out GPS.  Eventually though, we entered the area where it had last been spotted.
  
Here's the evidence I was presented on Thursday. 


A simple advertisement denoting an estate sale and among the many photographs there had been a flamboyant Singer wildly displayed in the foreground as if a peacock all un-whirled. A decoy. If you look beyond it, in the quiet dim of the background you can make out the indisputable Nova shape, the tell-tale N on the backside, and that somewhat obtuse line of rear inspection plate. (Yes, I know, it's sad that I recognize these things. It really is, I know. I know. I promise to get out more.) 

This morning we were hot on its trail, and when we finally got there, the peacock was no where to be seen. I took a deep breath and pressed further into the basement and for a moment I didn't see it because I had it in my head that it was black... but there it was... camouflaged in green.  

A handwritten sticker applied with a loop of tape asked forty five, and yet, I wasn't quite sold. I searched the drawers and they were all empty, and the attendant suggested I see the box upstairs of sewing related items and that's when I found the accessories box, and another one, and another one...

When we got home, hiding in one of the boxes behind a selection of new needles was a pack of  embroidered labels that said 'Hand crafted by Anne' so that's what we've named her. 

This is Anne of the Green Novas right out of the trunk and onto a cabinet top in the garage. She's still dirty and musty and not quite willing to move as she should - but it's all very encouraging.  There are spots of missing deck paint, and the obvious need for a lamp cover, but overall in she's in great shape. Hopefully by tomorrow I'll update this with a test stitch.


The other surprise of the day was found in a Clarks box (note: no Coats). When we opened it, the contents took a moment to sink in. I can safely say that I have never in my life seen anything like this before, and I probably will never see it again:


A real shame that peacock ran off as quick as it did...

Thursday, February 22, 2018

An Unexpected Trade


Experience with the 525 and BU sold me on the Necchi line, and that's when I met another guy who’s into machines. He seeks specific models for Amish customers and he offered me a trade.  So, now there’s an early model BU and BF Supernova on the bench. I thought I’d never see one, and now there’s two? 


Then - as if almost an afterthought - he asks me on the phone:
"Hey, somebody just gave me this Kenmore. I think it's froze up and I have no need for it..."
"Sure," I said, "bring it along. I'll see what I can do."
That was all on me. 
Although it did have it's attachments, and a full cam set, on the top of the cabinet newspapers had soaked into the finish. One corner of the veneer was beginning to lift. The machine was dirty, and... yes, it was frozen. My Niece stopped by as I was re-arranging things and took one look into the cabinet and said:  "Ewe, that's disgusting."


After dinner, at about 6:30, I headed to the garage, pulled it out of it's cabinet and set it on the bench. I pulled off the top cover and began cleaning and oiling. Surprisingly, inside the top was in great shape. The bottom mechs had some rusty bits here and there, but nothing serious.

Playing with the millimeter of hand wheel travel I traced the bind to the needle arm. Inside the front there was dirt and grim and a little rust. I hit the bar up with Tri-flow and went back to lube & clean. Ten minutes later the needle bar broke free. I ran emery cloth around the bar, and the presser foot assembly; replaced the rusty needle. 


Then I looked in the attachment box and found a bobbin case - cleaned that up - found some thread, and prepared to see if it would sew - and it did. I mean straight away sew. No tension issues. No dropped stitch. Just - bang - sewed. I changed the thread length - and everything worked. Even the front lamp flickered on and then stayed on! omg...

That's when I sat back and looked it over. The machine was still dirty. The attachment case was there and open, so why not right? Why not try the zigzag cam? And wouldn't you know it zigzagged.  I sighed... got up, unplugged it, went into the house and came back with a quarter bucket of Mr Clean and some rags. It was 8:32 when I finished.


The most (?) surprising thing about the 'Stuckmore' was the sound. The loudest thing when it ran was the bobbin case. It runs as quietly and nearly as smooth as the Necchi BU. It's was so inspiring that I began repairs to the cabinet.

I’m about to reunite them. The funny thing is… that I knew when I began this project  I might be spending a lot of time on something I’ll have to donate.  The machine might be durable and reliable, and hard working, but it’s still in that segment where the sewing world considers it too common.


 In a way, I think sometimes that’s exactly why I do it. Besides this machine, the trade really narrowed down my sewing basket list. I’m still looking for a portable hand crank for Sis. My own curiosity seeks out a specific White/Kenmore/Gritzner model and perhaps a Nova. (I should know better than to say that. I’d take in any Necchi in need.) 

But the rest? I think I’d let the rest go. The problem is that ‘the rest’ is quite a few, and I just added the one above. I may use a page here and do an inventory. Maybe one of the six of you that read this will show an interest.


Purpose and Pretties


My Necchi guru teases. She says I suffer from SMAD (sewing machine acquisition disorder) but it was never all about acquisition. For me, it was about learning new things, applying my skills, and saving what was useful. So many machines came into the garage last summer, some stayed while others left. Some I gave away, donated to charities. There were nine that left the country entirely, bound for missionary work, but the thing that remained constant for me was an effort to keep perfectly usable machines from the landfill.

A Husqvarna Viking 6240 portable had its ‘lifetime’ lubricant turn to shellac and needed a TriFlo and hairdryer treatment. The wheel that would hardly budge in the morning ran and sewed that evening. In retrospect, I got really lucky that the cam stack and worm gear were fine.  I wouldn’t do that again without checking.


A discolored Singer 457 and a Franklin Kenmore were on the curb waiting for garbage pickup in our neighborhood. I brought them both back. The Kenmore sewed and was donated while the 457 needed a top gear.  I sat it aside and recycled the old cabinet. 


A week later the exact same thing happened with a late 80’s Kenmore. All it needed was cleaned and lubricated. That’s it, and it gave back a great stitch: one of the best stitches, picture perfect. I miss that one. Then a distressed Stylist, a Singer 603e, a 401, a 201, and the garage became a little cluttered. A five-dollar yard sale Universal donated its 1.4 amp motor to the Pfaff. 


Sis added a pink 15 clone to the shelf in the sewing room next to a metallic-blue White, and I became aware of her division. Although she genuinely needed and used a handful of vintage machines for her work, she also enjoyed a ‘pretty’ for the shelf: especially a vintage White.


I was beginning to sort it all out.  The 500A had been a lucky accident. Sis wanted one and yet unbeknownst to her, it became something she could use. The Pfaff 30, for all its trouble was seriously heavy duty.  An occasional White machine on the shelf paid tribute to the late 77, and having a few steel geared machines as backup was always a good idea when you sew almost exclusively with vintage machines.

The 525 and 101 remained my favorites. All the others became learning tools.  Tools I needed when ‘that’ e-mail came. The offer was literally - How many old sewing machines would you like?  Sis and I looked at each other. We shrugged our shoulders and agreed that it wouldn’t hurt to go look.

Twice.

Filling the car each time.

The story was that they had belonged to a repairman who had passed. The young lady that rescued them had known the gentleman, and somehow the lot came to her.  She spends most of her time restoring Singer 301’s and 221 featherweights and didn’t have much interest in the rest. In front of a large out-building with a wide garage door we backed up the SUV, and a sorting process began. There were rows of Kenmore models to the left, rows of Singers to the right, and in the middle was the odd lot.

It was there in the middle, in the back, in the dark, I found a machine that would challenge me as much as the 101. The body dirty, chrome dulled, and paint cracked, and of course, it didn’t want to turn. Every inch of wiring insulation crumbled when I touched it. 


Of all the machines we gathered that weekend it would be this Necchi BU that was first on the bench. I’ll admit it now, I was somewhat obsessed. Something in the back of my head insisted that it would sew. It really didn’t have a choice. I was driven.

It took days. There wasn’t any good wire. It was bad into the motor. So what, I thought. So I haven't done this before, it'll give me an opportunity to improve my soldering! This one used up all my shrink tube... and  yet, every minute was worth it.


It's heavy; forty pounds and maybe the weight has something to do with it, but it sews. It sews like mad. It sews like no other: slow, smooth, flawless. It didn't go to the sewing room, or sit abandoned on the work bench. It holds down my nightstand (a genuinely unruly piece of furniture ever since I've owned it). It's there to remind me how hard work and taking chances can have rewards. It's not entirely pure. In the pile there was another Husqvarna/Viking six thousand series. This one I checked, and the worm gear was gone. Everything else was there including a Fr560 pedal. The one in the shape of a foot. It's on the BU now, and just as responsive.


The other machines were a mixed bag. Several Singers in need of top gears, two New Homes, and eleven 70’s and 80’s white bodied Kenmore 158’s. I’d bring one up and go through it. If it would run, sew, and zigzag, then it was set it a row. All tolled, six of the 158's would do both.  Two others would only sew straight and three were left for parts.


The zigzag six, and the perfect stitch curbside Kenmore, the Singer Stylist, and a Nelco all left the garage in January for missionary work outside the country.  I never asked what group or church or affiliation because the opportunity seemed so perfect: all electric, portable, class 15 zigzag machines. Each fairly strait forward and they all sewed as if they’d never stop.  If I could have turned them into treadles… they could have gone to Africa.


The lady that emailed says I should return because there's still some left, and I might just do it. Round two of missionary machines could happen. The idea of changing lives for the better is a strong one. Some of these machines have changed mine.


Monday, February 19, 2018

A Jaundice Babylock


Now, with two unexpected black Singers in crazy cabinets, I get asked to help move a friend. They had been sharing rent with several roommates in a house in Rochester and one by one the roommates lives changed and my friend was the last one out. That means they were the only one left to clean the place. It would take a week. Among the items roommates left behind... deep in the basement... under a pile of other stuff… was yeah, you guessed it.

This time it was a portable from the 80’s, and it wasn’t stuck. It was stiff, certainly, but not frozen. A few drops of oil here and there, a close inspection, a good cleaning… and the machine ran and sewed. Unfortunately, there was no paperwork, no manual (still haven't found one) and no attachments. The one thing it did have, was a good name: BabyLock.


The BL2000 Pro Lite is a simple machine.  It seems sturdy and it sews well, but the other thing that it had, was a bad case of being left next to a window for a very, very, long time. One side of the machine looked nearly new in white while the other side looked old, brittle, and very yellow. 


What I found this time was a cure devised by gamers to ‘restore’ their old gaming systems back to new.  Fortunately for me I did not have to create my own concoction because someone else had found it for me. The trick involved very strong hydrogen peroxide in a cream base and UV light. The easy method meant stopping by the salon supply store for some Salon Care 40 hair product.

Even though there are tons of videos out there saying the exact same thing, this method of re-whitening yellowed plastic is not for the bare handed. Gloves are a must.  Care is a must. Best done outside on a surface you don't like. The basics are: Gloves, Salon Care 40, the yellow parts, and several large zip-close clear plastic bags - and gloves. I mentioned those right? The parts are going to go in the bags so that they lay flat, so make sure they fit beforehand. The other thing you need is sunlight. 

After coating the yellowed bits with the cream, slip them into the plastic bags, zip them shut, and leave them in the sunlight. It all sounds easy enough, but if your too messy with a brush the parts may streak (I used a dampened sponge) and getting the cream to stand and not move around while slipping them in the bags was tricky. 


I did two applications and two full days in the sun. Often, I'd check to make sure the yellow edges were rotated so they got as much sun as possible. Then, once the parts became white, I rinsed and rinsed (submerged and rinsed) the bits off with water at first and then a mild soap and then more water and let drip dry. The bags were thrown away. Once everything was dry, I reassembled the machine.


This time, everything worked better than expected. I’ve tried this method twice. Once with the Babylock plastic and it worked great, the second time with the plastic panels off a Stylist and it didn’t work as well.I must have had the wrong sun.

The Tea & Iron Singer 66


When my sister returned she had all sorts of sewing related things to do but one of them involved yet another machine.  A friend asked her to come and get an old Singer if she wanted it. So we went and got it. At this point I gave up wondering why and went along for the ride.

It was a new-to-me cabinet (model 41) and a crinkle finish 66. This was the first machine I’d ever tested by hand where the balance wheel wanted to spin. The mechanics were a joy. It had been well maintained and ran and sewed flawlessly.  I have no idea why anyone would want to take leave of it, but there it was, in the garage with the very same cabinet issue as the 42: water rings from potted plants. The top was a disaster. "Ode to Saturn" came to mind.


When I set it off to the side I began wondering if it might be easier to darken the light bits to match the watermarks instead of the other way around… which started an evening searching out alternative methods of staining. If perhaps there was some kind of translucent black? Except there just isn’t exactly such a thing, so I found the next closest: tea & and steel wool in vinegar (the iron).

The recipes are simple. The application is an experience. To begin with, take several black tea bags (I used 5) and make a nearly a quart jar of tea. Let them steep. I placed a lid on the jar with the bags in the water and sat it aside for about a week. The second half of the stain was vinegar and steel wool. Some say to do the same, put a quadruple ought wad of steel wool in a glass jar, nearly fill that with vinegar, and let that steep for a week. Others suggest heating the mix to a boil in the glass jar, with the jar in a pot of water.  I think I sort of did both because I still needed to sand down the cabinet. I've since lost track of how many youtube videos there are describing this staining method; quite a few.


The 41 was not the best choice. If I had it all to do over again I probably wouldn’t have chosen that cabinet. It had turned legs (always fun to sand) and unbeknownst to me… four or five different colors of wood, but I’d gone this far, so why not try a little here or there? References suggested that re-applying the vinegar-wool mix can darken the stain, soooo… maybe I could even it all out in the end? Or maybe it will be a mess and I'll have to sand it again?

Not being entirely certain which of the different woods had how much natural tannin and which didn’t have as much, I hoped that the tea coatings might equalize the disparity.  I went over the entire cabinet several times with just the tea, and then let it all rest.


Two days later I began with the vinegar and steel wool. I did one coat and waited.  The change was both drastic and amazing. The areas that didn’t get ‘as dark’ got another light coat and slowly over the course of a week the cabinet told me when and where to apply another light coat.


I never did –quite- get the black ring marks out of the top… and I went a little light on the sewing surface, but wow – what a change!  After a second week of allowing all the surfaces to dry completely, two coats of clear poly went across everything.


Again, it might not be for everyone. I’m sure that if I tried it again my results would probably vary, as would anyone else attempting it, and perhaps (?) that’s a part of the appeal. It really was a blast. I really didn’t have a lot of control over what was going to happen.

Sunday, February 18, 2018

Saving Machine 101


The process became routine. I’d take a machine to the bench, do the research and the work to get it running, and then Sis would sit down and make it sew, but at this point, there were no more machines. I was finishing up the cabinets when she left for her two-week-long working vacation.  When it came to costuming, this is where she’d see most of her customers. 

She drove away shortly after 1pm on a Thursday, and as I checked emails there was a ‘curb alert’ (one of those ‘come get it today before the garbage truck gets it in the morning’ sort of posts). The photo showed a worn simple sewing table with an old black Singer, and it wasn’t like I hadn’t seen an ad like this before… but it was five minutes away. Out the window, storm clouds were visible. It was about to rain.


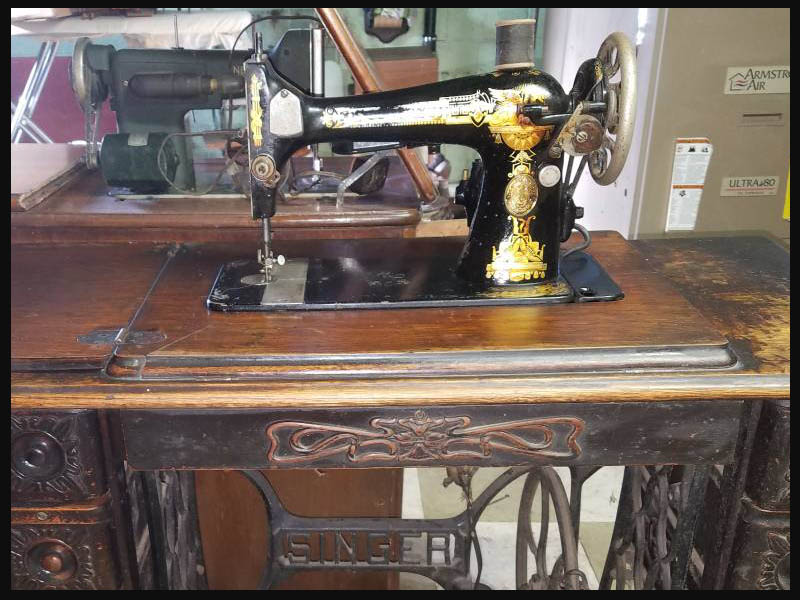
Twenty minutes later the table and machine stood in the garage. They were soaking wet. I went to identify the model except I couldn’t find the serial number. The electric motor looked completely different. Finally, underneath, there were a set of letters and numbers.

The simple desk was called the Singer model 40 Deluxe library table.  This was an early version since each leaf is the same width. The machine numbers identified a Singer 101 from 1929.  At least, that’s what they were once. The top didn’t close. One hinge was bent. A pivot pin had snapped. The veneer had stains. The leaf prop didn’t. Half of the knee control lever was missing along with the bobbin cover, and the balance wheel wouldn’t move. Evaluating it all, I thought about returning it to the curb.


In searching maintenance information I found a forum discussing another frozen 101.  Their solution was to add a washer under the balance wheel nut, and they were right. It allowed just enough leverage to move the mechanism back and fourth the tiniest bit. This would be the test. If it came loose, then it might be worth the bother. I sprayed the oiling points with Tri-flo that night and in the morning that tiny bit of movement doubled. Each time I walked by it, I’d stop and nudge the wheel. The next day it moved a little more, then that much again, and then finally a whole rotation. I retraced steps with machine oil (13 drops for the spider wick). It took four days before the wheel moved by hand without any complaint. 


There were wiring issues.


The worst of it was the run from the terminal to the ceramics of the knee controller. One wire lay bare across the other's contact post - a short, or fire, about to happen. I couldn't salvage any of them and made a new set, and since I was there, cleaned all the contacts in the controller. The four wires running from the terminal to the light and motor had a couple little spots that I covered in electrical tape temporarily. It would all have to be replaced if the machine would run. 


Up top, I stripped the needle bar of rust, printed out a threading diagram, found a fused power strip and a bobbin. If it wouldn’t run, or sew, there wasn’t a reason to go any further.  With everything connected I flipped the switch on the power strip and the garage lights stayed on… always a good sign. Then, with my insulated glove hand… I nudged the metal knee control and there was a buzz, but no movement. I turned it all off and went back to the hand wheel and tried it again, doing several rotations. It was a touch stiff, but felt better each time around. The second time I tried the knee control the machine responded, and before long it hummed along completely oblivious to its condition.  It was a nice sound and even in its slightly askew position, there wasn’t much vibration. After a few more ups and downs on the revs, it was time to turn it all off and find thread.

I followed the threading diagram and it made the initial loop when asked by hand and I swept the lower thread across the deck, arranged the test cloth, dropped the foot, eased the knee control and got nothing. It wouldn’t sew. It felt like it would. It acted as if it was going to, but somewhere something wasn’t right. I pulled the top thread, made some knots in a piece of it and ran it through the upper tension and then chased that with a piece of Emory cloth. I’d replaced the old needle and it was in the correct position, but not knowing any better I cleaned the old needle and put it back. Out of my sister’s playbook, I changed the top thread, but it still wouldn’t sew.

I stopped, sat there, starred at it… and something didn’t ‘look’ right. Back upstairs on the internet I retraced images of other 101 machines, and that’s when it hit me. There were too many holes in my bobbin (and have been educated since). Since Sis had a habit of buying up every odd catch of sewing items she came across, I rooted through a box on the shelf in the sewing room marked ‘other bobbins’ and found one that matched the online photographs. 


With new top thread, the old needle back in place, and the correct 66 type bobbin instead of a 15, I tried it all over again. Material in place, lower thread up, pressure foot down, I nudged the knee control and it tossed down a stitch! It wasn’t pretty. I needed to adjust top tension, but it was there. It would sew, and still, I was torn between elation and resignation. 


The list went like this: replace pivot pin, straighten leaf hinge, disassemble the leaf support rod mechanism, clean it, oil it, put it back in place. Remove the top tension assembly, clean and replace. Rewire the motor and light. Replace the bulb (old one lasted three minutes). Detail clean the machine, and then… there was the cabinet finish. 

I have to thank Nicholas Rain Noe’s Vintage Singer Sewing Machine blog and his detailed step by –photographed- step on How to Rewire a Singer 201 potted-motor, that gave me the education and materials list to apply to the Singer 101. 

There are obvious differences, but the basics are very similar. The flexible lead tube that routes the light wires around the internal shaft on the 101, is ingenious, but it’s not fun.  It took me two days to replace all the wiring, another to attend to the leaf prop, pivot pin, bent hinge… well almost bent hinge. It’s a lot less bent, but I really should find another one.

The hinge isn't the only thing I should find someday. After a week of the metal digging into my knee I went and made an extension for the controller. Sat there one night and just whittled it out of an old chair piece. It's a lot more comfortable, but maybe I'll sew up a little padded cover...


By the time I got to the cabinet I’d grown strangely fond of it. Sure the finish had worn in places, and there were nicks and stains. The worst were on the sewing surface around the hinges where over time the iron from the metal had seeped into the wood.  And yet… where would you ever find a cabinet where there were black stains around the hinges where over the years iron had seeped into the wood? 

The whole piece seemed to be telling a story, it’s autobiography. As if to say: This is where the sewing stool would always nick my leg… and so on and so forth. This was beyond patina. It was history. I couldn’t strip it. All I could do was try to preserve every flaw that was there.  I'm sure some won't like it, but for me, it's not a museum piece. It's something to be used and enjoyed, and I enjoy it this way. It doesn't need to be set near a window for a view, it's already built in.