Friday, March 30, 2018

Sewing with Cylons

Machines find there way here in haphazard ways; a friend of a friend, an unintended yard sale, online ad, and yet the mechanics are almost always the same. There are few differences in the all metal ones: rotary versus oscillating, shuttle or round bobbin, strait stitch, zigzag, decorative... but essentially, at the root of it, there's a purpose, a designed logic. They do the tasks we ask them because we built them to do those tasks.  It's when they misbehave that it becomes a problem.


Before this one made it to the garage from a trip to Baden in a borrowed minivan, there were obvious differences. The cabinet had been painted, coated in a flat blue-black and then sprinkled with specks of white as if it were a chunk cut from the sky's clear night; celestial, cosmic, and seemingly random. It didn't occur to me that  it wasn't by accident, that the specks might line up or that it might be a map to some lost colony. The image wasn't clear or precise, appearing as if captured in motion as the photographer had been hurled through space.

When I checked the cords... it felt like all of this has happened before. The ones to the motor and the lines to the controls were okay but this time hidden behind the the front door one wire had snapped completely in half. There had been a chance, a hidden opportunity for it to have lit up the entire deck: death by electrified VSM. I don't think it was planned... but it would have been a victory for the machines. I had to laugh about it, thinking I should be a lot more careful for what I wish for: it just might kill me.


I began the trace. New wire would be required from the front of the head through the entire length of top assembly and then down in a route parallel with the connecting rods and arm shaft to a rear access port.


As long as I loosened all the tie down clamps there was a chance to attach new wire to the old and ease the tenuous combo out the port entry. The good might follow bad through the mechanical maze. It took a light touch and hunk of shrink tube and it almost failed. Perhaps the better thing to have done was to get out the soldering iron and make a union which might not have been as flexible, but probably sturdier.


It's very tight inside the light assembly; very little room. The leads off the socket were good and this time. I spliced them, twined the wires together, and then used a pair of wire nuts.


It bothers me. If the light door were to be closed most of the time then there shouldn't be any issue with the arrangement, but it isn't closed all the time.


Usually, if the bulb is okay there's no reason to open it (no wiring diagram) but this model can't be raised or lowered into the cabinet cavity without opening the light door to clear the light switch. The tolerances are too tight as if the unit wasn't built for this, that it had once been re-homed.

Inside the woodwork there's a second wiring set, a disconnected knee control with wires wound in old cloth insulate. Hours passed as I replaced questionable methodologies and tried not to make more mistakes. Having it safe for the long term took precedence. The 'right now' shouldn't win over doing it right: a familiar theme in my life.


With all the wire connections secure I closed the door and re-affixed the motor then began the usual lubrication and cleaning process from the top down making sure everything was moving freely. I've included the new process of pulling the slide plate and feed dog cover to clean out all the old lint, even if I can't see it built up in between the teeth.


By the time I felt satisfied that the motor would turn all the mechs it had become dark and shadowy in the garage. Somewhere upstairs in the house someone had music playing, an eerie drifting sound.. and that's when I finally gave it power, and became concerned of what I may have awakened...


As if the star box, deja vu and broken wires hadn't been a warning...  

I went over the controls. The one thing missing from the bag of extras had been an operators manual. I was going to have to guess which controls went where and cross my fingers. The one that still gets me is the top wheel. It has four settings for the internal cam. One is a zigzag,  and it's polar opposite a curved stitch. On the east and west points there's a number one, and a number two and I have no clue. It might as well be hieroglyphs or the mark of an ancient alien race. I went for what I thought must be a straight setting and threaded the machine.


It complained. There was a low frequency buzzing noise and then an audible groan before the wheel turned on its own, as if it had been in hibernation too long and had to stretch and yawn. Then motion began and the wheel spun and the needle bar began a slow up and down. All of the sounds were promising, hopeful except for maybe the low vibration buzz. I pressed a little harder on the pedal. Revolutions went up and I brought them back down and it all seemed to work.

I stopped and prepared the threads and that's when I realized all the warnings were credible and found out that it's nearly impossible to set the bobbin in place without lifting the front edge. Once it was in and the machine back down, I raised the foot and asked it to pick up the lower thread by hand, and it did. I swept it back. The first stitch, straight ahead, was no problem. and since the width lever worked I began to guess at zigzag.

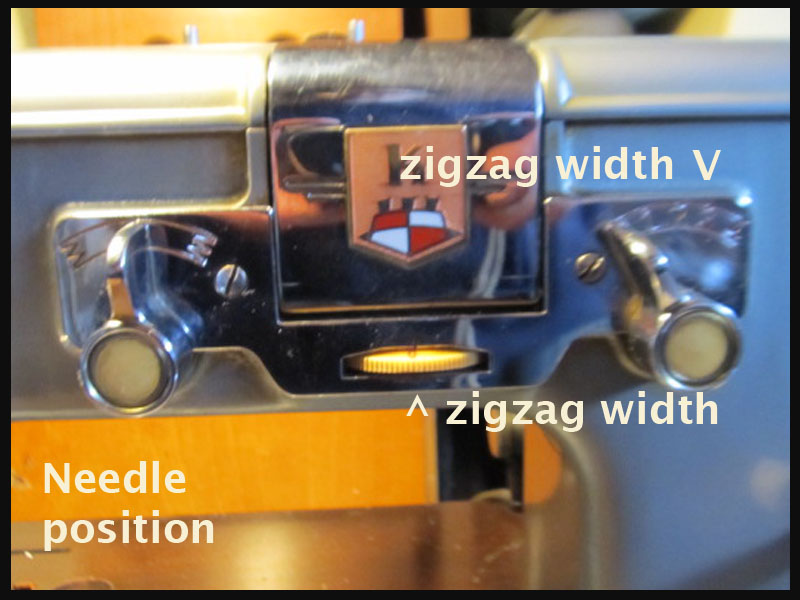
The setting is complicated - or maybe not, maybe I'm doing it wrong, but I set the top wheel on the zigzag icon and then turned the white front wheel to a middle setting between 1 and 6. Then I had to match that by turning the chrome knob. With those three adjustments in what I thought must be an agreement I dropped foot and tried again.


It wasn't the prettiest and there was something wrong. There was a skip in the pattern, a frakture. 


By now it was well into the evening and the grill kept taunting me.
I'd see it in the corner of my eye everywhere in the garage.

Like I was being watched...


With fatigue setting in I was certain the machine was going to beat me unless I found a harbinger; 
something with historical success in winning battles against it. 

The internet suggested two things:
a new needle and a Starbuck.
I tried them both.


So I can't say which worked, but I did feel somewhat rejuvenated and after threading it all again. The zigzag came out right this time, although interesting. I've never seen one quite like this.


There was one last bit to solve. Throughout the entire process the low vibration buzz had remained. It took forever to figure it out because I couldn't feel where it was coming from. It was everywhere, a subtle but annoying noise. If I applied pressure to the deck in one corner it eased up. I added another layer of felt to the lip where the machine sits. That didn't do it. I tried tightening the pivot posts and that was the one thing that came close, so I began to adjust them in different directions. The vibration changed. Eventually through trial and error I realized there was the slightest stress against the pins. The machine was sitting at an ever-so-slight angle within the wooden frame. The angle created a tightness that reverberated the motor hum. It would have driven me insane, but it's gone now.


Maybe that's one reason why I do it. I mean sure, every time another machine comes in the door it does feel as if it's all happening again. It makes me question: if it -has to- happen all over again... and yet each time the outcome is different. The controls and this machine are different. It's smooth and interesting. Every curve and shadow in the paint seems to change hues slightly with the light.  In the bright daylight it's a blue that fades toward an aqua at night. Oh, I do like this one. It makes me want to try the other two, the 840 and the Lady Kenmore 89! But I know I can't save them all. I can't even store them all. I may need to let a few more go.

Monday, March 26, 2018

Another VSM Weekend

Saturday morning I was determined to have everything needed to get Anne back in her cabinet and the cabinet in the sewing room.  There were minor hurtles. I had used a drawer runner from an old ruined cabinet and cut it to size and glue it in.


The wire junction box would have to be attached to the cabinet somewhere just inside the lid - making sure there was enough wire slack for the machine to travel down and up. I needed to find a mounting screw 'just' long enough to pass through the Bakelite box and yet short enough that attaching it to the side of the cabinet did not interfere with drawer travel. I ended up using the old Singer pedal mount as a guide and after measuring the thickness of the Bakelite found a wood screw a quarter of an inch longer. The wires were indeed just long enough and the machine can travel up and down without issue. The problem was... that when the machine was lowered the hand wheel actually bumped the plugs! I had to relocate the junction box four inches back.


Then there was a search for a replacement machine pivot since one of the two original ones had broken. I got lucky in the spare parts drawer and found a matching set of pivot pins for the early Necchi mounts. These pins had been in the BU head when it first arrived and were replaced with a newer set that I had to grind down ever-so-slightly to fit into the machine.


I did manage however to adjust the width of the machine on the pins so that it could pivot back and forth without causing any further damage to the veneer edge. Someday, I will have to make repairs here, but for now, it is inside, and ready to use.

*For those that don't know, the pivot pin diameter for late 40's early 50's Necchi's are smaller than most other manufacturers, and the mounting holes are drilled for that pin diameter. More modern (or more readily available pins will not fit). Either the mounting holes on the machine must be drilled out, or the new pins must be reduced slightly. I choose to reduce the pins slightly since both the BU and the Nova are forty pound machines. I'd rather have a pin snap than a machine case crack.


So here she sits, ready to go. There are two last things on the list: finding a light cover, and replacing the odd little bits on the cabinet handles. If I can find a local cabinet maker perhaps I can purchase a few bits of marble trim to sand down to size.


By the afternoon, Anne was as complete as she could be, back in her cabinet and ready to go and just in time for Jacob to arrive. Jacob was looking for a different sewing machine. He had one, but needed something durable with parts availability and hoped to find one that did a little more than straight ahead and back-tack. I was ready for him and had cleaned up and oiled the Singer 401. The machine and attachments had arrived here as a gift, and although it did need a good going over at the time, it had been here for over a year and rarely used. The photo above is how it looked on the day it arrived

After he checked it all out and realized that any and all of the attachments on the 401 would work with his Mothers 500A... we packed it up in a travel case. Sometime this week we'll arrange a time when I can go and pick up his old cabinet machine which ends up being a 15-91 in a type 40 table.  It's funny though in that it still feels awkward to watch a machine leave the garage. I can remember the day and the weather, and could probably drive right over to where I picked the machine up last year.


Sunday morning became the day to tackle the broken zigzag lever on the Singer 237 from the estate sale two weeks ago. I'd spent a few fruitless hours looking around the garage for something that might fit and finally stumbled (quite literally - because I accidentally kicked the piece) upon a parts machine cover that held a couple of interesting clips.  They were about the right length, about the correct thickness, and had just the one little hole on one end... and sure enough it was about as good as it could get.


The piece slipped right into where the original lever mounted! The only issue that concerns me right now is the width. It's possible that because this lever is twice the width of the old one that some fraction of stitch variance may be lost, but after testing, the machine is doing a straight stitch, and the zigzag doesn't look to shabby.

With those three machines now mostly out of the way, I sat down to check local sales on Sunday afternoon and found an unusual image. It had that deja-vu feeling to it, very much like the experience with the Nova. There was 'something' to it that I knew... even though there wasn't really enough of a photo to clearly identify the machine. Before I even tried to hunt down an identification, I responded to the ad and crossed my fingers that I wasn't too late, which was good on my part because now, today, Monday, I'm supposed to pick it up at 3:30.

Here are the two photos from the CL listing:


It makes me wonder if anyone else can do it, or is it just me? I've been looking for one of these, waiting for it to happen. If it is indeed what I think it is... then my sewing basket list of machines to find and experience has been significantly reduced. It may be that I only have the Pfaff 130 and perhaps a Mira left.

There's still plenty to do here, and more machines to find a home, but I really need to start setting new goals. I'm running out of old ones! Now I have not yet gone to get the machine above, and perhaps I'm wrong... but it really does -appear- to be a 1956 Kenmore 117.740. This would be the German made machine and if it's been in a damp place for a very long time, it may be difficult to get running again. Tolerances were very tight on the machines made by Gritzner Kayser for The White sewing machine company - which provided machines for Sears for many years.

I guess we'll wait and see...

*just got home and figured out how to lift the machine up (have to open the light door). and here it is:


The 1956 Kenmore 117.740 - imported by White - manufactured by Gritzer-Kayser zig zag machine!

Friday, March 23, 2018

You've got the string?

It had taken hours, many of them in a row. The mystery machine sat lying on one side, the bottom cover hidden under a week's worth of dust. There were screws and bits and tufts of lint strewn across the oily wooden work bench top. The days had lapsed. Each beginning as exuberant and slowly turning into toil and drudgery, uncovering technological anomalies, strange things in the dark, but never once a spark of life.

There were pivoting spring plates, ancient oil and paper condensers, and wire nuts and none of these were the root cause. Nor were the wheel weights: small flat metal pieces that looked stationary but were meant to move, meant to swing out as motor velocity increased as if speed were adjusted by g-force.

There were spring levered copper contacts that worked back and forth with the antenna controls, and a spaghetti pile of wires in different colors that chased each other around the inner workings, some held by clips, others managed to survive protected only by a well placed piece of cardboard.


When I gave up, which I did daily, I'd grab my hat and coat and walk around the neighborhood just to clear the cobwebs and visualize how I thought it was supposed to work. It didn't help. I believe now, in retrospect, that I'd convinced myself that if the machine had ever sewed... it must have done so by magic.

None of it made sense. As if maybe it had been wired for something else, something notorious and dark: a faux short wave radio smuggled to a third-world field agent, or worse yet: a homing signal. They knew exactly where I was and I'd never hear the black helicopters until it was way too late.


Friday morning, up early, and I dressed and headed out. An estate sale promised sewing machines and there was that photograph: the one with a sixty year old spool case. The sale was a bust. Online auctions had given them the idea that things were worth three times the price of the real world, and it didn't help one bit that I actually wanted the case for the most outrageous reason possible: to store spools.

What was worse, nearly criminal, was to advertise things and not have them. I was there ten minutes after they opened and asked.
"Sewing machines?"
"Those have been sold." the lady said.
"Already? You just opened." I inquired and she looked a little frazzled when she said the machines had been given away, donated to a local church group.
"Then perhaps you shouldn't advertise things you don't have," I stated flatly trying not to be too curt, "you might waste somebody's time..." I turned to leave.
"I still have the one here," she countered and looked across the room, under a table, and ran to fetch an open box and showed it to me. It was a Necchi, white with blue trim and a three digit model number: 5 3 1.

"Taiwan" I said, and she looked puzzled and I wanted to explain it. I wanted to go into all the gory details. I wanted to tell her about Italy, Japan, Taiwan, and China. I wanted to confess my intimacy with Silvia, Nora, and Julia... and then disclose the four downward steps. How to go from great steel and close tolerances to intolerable crap plastic in four easy falls, but I could tell she wasn't ready for it, so I kept my mouth shut.

"You know a lot about these?" she asked.
"They're like old cars." I said, and on the way home that statement stuck with me. There was more truth to it than I thought. Something I'd seen the bowels of the portable; something I hadn't seen in years - a familiar image - if I could only place it.

Once at home, I slipped out of my car and down to the work bench and there it was, that same image: plain, simple, and thirty years since I'd looked for it. Two discolored dots needed a tool, a special tool, one I used to carry in the box but somewhere over the decades I'd stopped. It had become as useful to me as a plastic sewing machine.


I went inside and up the stairs to the medicine cabinet and sure enough I found what I was looking for hiding flat under other boxes. I grabbed one and returned to the bench, pulled the electronic points apart, and sanded them clean and perfectly flat with an emery board - like I used to do on the points of an auto's distributor.

Then I reattached the important bits, plugged it in, flipped the switch and a blue glow began to emit from the lower housing. There was a hiss-snap, one low crackle, and the machine came to life. I took down the antenna, unplugged it all, set the oil can within reach and began cleaning as I put it all back right.


I still don't know. I may never be able to say how exactly how this thing works except to suggest that it's powered by blue light. I can't even swear with any authority that this Kenmore 116.531 isn't the same exact machine in that online video. There may be just the one of them... an oddity passed from hand to hand even though there's a sales receipt of sorts. It was tucked casually into the pocket of the suitcase as if no one would notice: a plain white envelope holding a tri-folded warranty dated 1956.  It claims to have been sold to a lady named Gatts in Palmer Mass. It suggests she bought a model 235.... and the agents number was 2024... or was it?

I'm still skeptical,
but at least I can pass it on now
maybe wait for the next low voice on the phone
and another clandestine meeting
on a deserted street
on a dark night...
in a city that always sews.

Sunday, March 18, 2018

I've got the yoyo...

In an undisclosed location in a part of town I could only call 'empty' I checked my watch for the forth time: still early for the rendezvous. As the second hand swept toward six, the mystery man from the north arrived.  I could only assume it was him; a low voice on the phone, if it wasn't, then he'd had someone else make the drop.


The nondescript pick-up truck parked a distance away. He left the motor running and moved around to open the passenger door. For a moment I worried it might be an invitation - but it wasn't. He reached in and lifted up a squat little case and swung it out onto the curb. Then, with a feigned nonchalance the figure retraced his steps, and with the quickest glance and slight turn of wrist in my direction, he climbed back in and drove away.

I waited again; waited for tail lights to drift off into the distance. I stuffed my hands in my pockets and shuffled a short pace back and forth. Minutes elapsed as I scanned my environment; searching for any other sign of life as the day's warmth fled as quick as the daylight. When I finally felt the moment was right I slipped across the pavement, dipped one knee and retrieved the case, then made a bee-line back into the shadows feeling quite concerned.  In the act of grabbing and lifting... everything I thought I knew had gone out the window. The case was too light for what I expected. It all felt wrong. I had to get out of there.


Hours later, still under the cover of darkness, and after a meandering and paranoid drive of mirror glancing, I was alone in the shop with the work lamp rolled in position to cast an illuminating pool around a low stool where I sat the case. After a careful examination I rolled it gently to one side and cautiously undid each latch to look inside.


On one hand, I knew exactly what I had, and yet on the other, I had no idea at all.


It was a machine, certainly, but unlike any other I've ever seen. The stylings were from another era, or planet, and yet in the hard light after lifting it to the bench I found a series of numbers. A search found next to nothing. It was as if it never existed, was never made or sold; and yet here it was: hard and cold in a steel blue-green, except it couldn't have been steel. It was far too light for a normal metal:

deceptive even in the wide open. 

The labelled name was as common as they came, and I wondered if it was a ruse since company information never mentioned it, never recognized its existence  - perhaps on purpose? A rogue, a misfit, an unknown experiment gone awry. Hours slipped away and then near both exhaustion and dawn I found a clue: a little-viewed video: one of those you'd never see creeping up the side window as 'recommended'. One had to search for it: call it out desperately by name:

https://www.youtube.com/watch?v=-136OqmpclE

and even then...

only hints to its origin


or the reason for a four inch long power cord,


or the alien antenna-esque controls,

or magnetism...

All I could think of then was stealth or deception. As if some government had made a one-of prototype off a last sketch by a dying Nikola Tesla... and then hidden it in an indistinguishable package made specifically for hiding its true nature. The perfect guise for a tall, thin, long-haired, short-fat-bald-man wearing a bowling shirt and driving a white late-model sedan. He'd park on the street, blend into a crowd, slip down a church alley and tap twice on a basement door, and be right on time for the weekly quilt club.

Undercover over-covers. Ingenious,  and that's when it finally occurred to me that it wasn't the who that was important, or for that matter the why, this moment, here, now, was all about the what: the unspoken assignment and the reason I'd been chosen.

Someone wanted me to fix it.

I redonned my hat and coat, slipped out and back into the car. It was going to be a long month and I was going to need two things strait away: coffee, and a bakery.


Tuesday, March 13, 2018

Rewiring Anne: A 1953 Necchi Nova Part 3

With all the decisions made, the tools lined up, the work bench clean and a spot chosen carefully for the hot soldering iron, it was time to get down to business.

Cutting the old and new wire.

This requires more sharp cutter than practice.  It can take formidable pressure to get a clean cut. More often than not I end up with one or two little strands that I have to carefully snip to length.


Stripping wire

is one of the things that a wire multi-tool is supposed to do. Getting it just right is a trick unto itself. I have to be careful and watch what I'm doing. My issues may have more to do with having an older multi-tool and it could be a tad dull, but being older and a tad dull is something we share, so I don't ever complain.


The wire stripping part of the tool is labeled per gauge. I'll insert the wire and press down allowing the jaws to just cut into the insulation, then I'll or push the tool away from the cut in the direction of the intended bare wire section (still closed) and the insulation should slide off. Sometimes I have to place the wire in the slot, pinch, and then turn the tool on the wire and pinch again. just to make sure it's cutting into the outer covering, and I have to be careful pushing/pulling. More than once I should have allowed a little more free space for what can be a rather sudden follow through.

One wire seems to always be different from another wire, and the longer it's sat around... the more resistance there can be to the insulation. For me, it's good to have new wire and enough of it for a mistake.

Since I now know the length of new wire that I want, I'll go ahead and cut those. Then, I'll strip the insulation off one wire end: between one half an inch and three quarters an inch in length.


Here's the new wire being held up against the old leads of the motor. ^


After a very careful examination of the old motor leads I found the last bit of insulation to be very good. Apparently being encased in the safety of the motor kept them in great shape. I rolled, and pinched, and the material was not dry and it did not crumble.  So, instead of having to take the new wire all the way down to tiny little original leads, I chose to save what I could and leave a little room for future maintenance.


I cut the old motor leads so that the bare wire before the good insulation was a length equal to the new wire end I just stripped. These two will be braided together.

Wire Braiding 

Is simply that. Two ends of wire twisted together in a braid. Wire isn't the friendliest of mediums to manipulate for me. Single strands can be rebellious and want to wander away from what everyone else is doing. It's like getting everybody on board for a perfect family photo. Sometimes it happens quick, other times there's considerable fidgeting.

Since I did have a length of the old motor wire and plenty of new wire, I did do a couple of test braids just to make sure I was up to the task.


Soldering

Before I even tried to solder once, I read several blogs and watched youtube videos. Even then, my first test attempts were sloppy. After awhile, I began to understand what a good solder looked like, and noted what mine looked like... and went back and practiced more until I got better.

When a 'good' solder happens for me... I can watch the solder turn liquid and 'flow' throughout the wires - even on the inner strands. The fluid literally runs as if it's being piped from one place to another. It's fun to watch when it happens the way it's supposed to.

It was time to set up the helping hands and figure out access to the wires with one hand holding a hot soldering iron, and the other holding the roll of solder.


This is also when the helping hands don't just provide a prop for the wires, but perform the very important roll of a heat sink. I had to attach the clip on the bare braided wire section as far off to the motor side as possible. That placement should be ideal to allow the clip to pull heat away from the soldering process and then dissipate that heat through the helping hand structure.


I got lucky here and my neighbor was walking by and I asked her to take a quick picture since I couldn't. This shows my route into the fray with the soldering iron, and the solder which is rolled out about half a foot with the reel of it in my right hand.


Here's a photo of the set-up on the second wire, this time with the clip as far to the other motor side as possible.

Going back to the first I had the new wire on one side and the old on the other. I had braided them together. the next step was to wipe some flux across the braid with a cotton swab.


It was time to plug in the soldering iron and allow it to heat. To be honest, I allowed it to heat twice. The tip of the iron was dirty and once it was first warm, I ran it across the damp sponge to clean the tip, then allowed a few more minutes for the iron to regain heat.

Carefully then, with everything set, I reached in with the iron so that the tip touched the braid from below. As the iron heated the wires the flux began to run and there were a few whiffs of smoke. Shortly after that I moved the solder into place from above and upon touching the braided wire it became liquid and flowed through the braid. When it appeared as though solder had run throughout the braid I removed the solder and the iron and waited.


It takes several minutes for the solder to cool and I did not want to disturb the process. Before the soldering the wire was somewhat malleable, but the solder will stiffen the union. Any bumps or movement between hot and cool could crack and break the joint.

After about five minutes or so I removed the one clip (which can get rather warm) and then the other and went about arranging the helping hands and motor for the other wire to be soldered. The entire process took less than twenty minutes. Once the wires were cool it was time to cover the unions in shrink tube.

Since shrink tube reacts to heat... all the wire and soldered area really does need to be cool. I needed lengths of shrink tube to cover not just the soldered area, but to be long enough to shrink around the new wire for about a half an inch.


When the first tube was in place, I used a disposable lighter flame back and forth across the tube until it reduced in size. After the first shrink tube cover had set and cooled, I added a slightly larger diameter tube to cover the a part of the old wire insulation and the union. I'm double layering to ensure no gaps in insulation. Then, on the second wire, I repeated the process.


Here's my final product laid out across the motor cover awaiting the Underwriter's knot. This knot is tied with the two strands of wire to be located inside the motor assembly. It's not tricky to do on a flat surface with all the room in the world, but here with the extra thickness of the shrink wrap, knowing it's all going to have to go into the housing... it might get interesting.

(Great video on tying the knot: https://www.youtube.com/watch?v=jpdTG1-YJpM)

The reason for the knot is so that it is larger than the access hole of the metal cover of the motor. This way any external force that may tug or pull at the wire will not yank directly on the leads. The knot is supposed to take the strain allowing the wiring inside the motor beyond the knot to remain in place. Without this, or some other form of restraint, it might be possible to yank wiring right out of a motor - even if it was running.


What it comes down to is that it's a little crowded in the back end of the motor. The available free space was designed for the original wiring. The shrink tube doesn't exactly make the underwriter's knot any smaller, so I really had to very careful slipping everything back inside the housing.

This is when I needed that reminder photo:


Carefully... the end of the new wires were routed through and out the access hole, and I began to slowly nudge the motor back together. I made sure the other two original wires returned to their routes and then tucked and edged the new wires into a position where all was clear.


It was at this point, when I began to relax a little. The procedure from here on was one of reassembling.


Try as I might, I could not get that darn little pin back into the name plate. The same thing happened to me on the BU and my solution for that was to replace the soft metal headless pins with real, although tiny, screws. I may have to do that here as well. If it's my only real error in the entire process... I'm okay with that. I'll find a fix later.

Once I returned the long case bolts securing the two halves of the motor I carefully returned the springs and caps by hand. I can twist them back on holding them down with a finger and turning the motor. It's almost easier in that I can feel the threads and tension a lot better.

Then, the bracket screws and washers and bracket and I'm almost back to the beginning. The pulley will wait until everything else is back on the machine, and there will be a few new things:

When I brought Anne home the wires to the motor had not been routed correctly. They should have come out of the motor and then passed through the hole in the deck. That's the correct route. To do this, I would pass the wire ends through the deck, then attach the motor bracket with motor to the machine body.

Then I carefully marked the place where the motor wires were going through deck passage on the gold wire (It's Pittsburgh, ask for two different colors of wire and I get black and gold...). Since I have not yet attached the plug to the wires, I removed the wires form the passage and slipped a piece of shrink wrap over both wires, centered the wrap on the mark, and shrank the tube. This gives the wires a layer of extra protection from the metal edge of the deck as the wires will move a little each time the machine is pivoted.


The added bonus was that the shrink wrap gave me an anchor point to lightly twist the two together before attaching the plug. Two became one. With all of this out of the way, I could go back and make sure everything was ready for a test. I slipped a belt on, adjusted the pulley position before securing the set screw, tightened the bracket to the body and it was ready to test.


Out came an extra pedal and Mercury box I just so happened to have, and the fused power strip... and within minutes I pressed on the pedal and the motor spun to life! It sounded great! I tightened the hand wheel nut and threaded the machine.


So there we go. Just as I believed. Anne would run. She would sew. Everything appears to be working as it should, although... the material isn't feeding quite right when asked to zigzag (it's drifting a little). I may have some things to do there, but I'm adjusting the final list: new screws for the name plate, new belt, find a light cover. I'll continue with more detailed cleaning now that I'm convinced she's going to be okay and hopefully I'll have Anne back in her cabinet shortly.

She sounds good too! There's a little more noise from the front end than on the BU, but I'm betting it's some thing I have overlooked, or maybe she's just finally able to tell her story.

So it's not all over yet. I'll need to replace the original junction box, and find a pedal of choice, but now at least I know that my efforts were worth it. That pretty, green and original motor was salvageable, just some little details left. My work here is certainly not any where near some full-on museum piece redo, but that wasn't the goal. The goal was getting Anne back to the sewing room and doing what she does best: sewing all the youngsters how its done.