

The first 15-91 on the work bench: a 1946 model.

Here's a subtle clue for any aspiring vintage sewing machine fan. If your new old machine arrives with a wooden spool of thread on the spool pin... chances are... no one has sewed on this machine for a long time.
Hint 2: If the machine arrives and the bobbin is stuck inside the bobbin carrier because oxidation is beginning to form a light sheen of rust on the inside of the bobbin carrier... then the machine has probably not been run for a really long time.
This is important.
If the machine has not been run in a very long time (and there could be a host of reasons) chances are there might be a problem with the machine. That's one of the reasons why people stop using things. I know these signs are subtle, but they can be very telling. Consider them warning signs. Obey the first cardinal rule of vintage sewing machines and never just plug the machine in to see if it works.
There was a very good reason why this machine has not been used in a long time:

Those are bare wires. They run from the Singer wiring junction and go up into the motor. They were not made that way. The wires should have insulation. Plugging this machine in could have caused an electrical short. Always check all of the wires, and always run your tests from at least a fused power strip if not a ground fault interrupt (GFI) - or both! And, just like with the Cylon Kenmore, it's not always just the motor wires - check all the wires.

I managed to solder in new leads within an hour.
I like to know that the machine will run before I spent another minute cleaning and detailing.

Hand wheel removed.

Motor assembly removed from body.
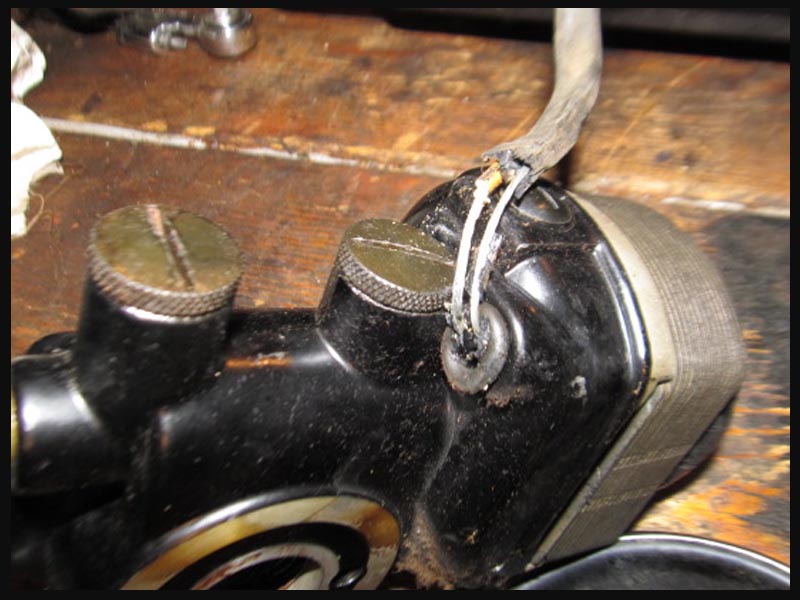
Better picture of the bare wires.

Old wiring ends removed as insulation crumbled away.

New leads cut, stripped, braided onto the old, and soldered.

After all that, I did the shrink tube, tied the underwriters knot, and put things back together. Then I set the fused power outlet and began the process to test run the machine. It was turning freely and only a drop of oil here and there seemed appropriate. Once everything was in place, I flipped the switches and got - nothing. That's always a little worrisome. The first thing that goes my head is: What did I do wrong? As I sat there going over every step I realized that the one thing I hadn't checked was the power cord that came with the machine.

In the photo above, directly below the plug one can see where one of the two wires from the power cord had been pinched and broken in half. This is probably a good thing. It's possible that electricity would never have reached the bare wires of the motor if some one had plugged it in using this cord. Fortunately, this is the very old style of junction plug. I can unscrew the Bakalite halves and install a new cord. For the time being, I found a much newer cord and resumed the motor test.
With newer cord in place, the 1946 15-91 came to life and then it put up a little more of a struggle before sewing. The needle needed to be correctly set and the machine properly threaded (right to left) and away it sewed! Now, I feel as though I can afford to spend the time cleaning all the bits, retracing some steps with proper long-term maintenance, and fixing the light assembly.

The second 15-91 (above) came in the very next day, and although the type 40 table (version 4) certainly needs some work (photo of the old power cord was taken on the cabinet's top surface - yikes!) the machine itself, although threaded incorrectly upon delivery, sews just fine, and it's a true centennial! It was actually made in 1951! This machine sews just as well as it's older sibling.
Another green one:

Along with the 15-91s came another green Kenmore 158 machine. It appears at first to be an identical twin to one already in the garage, but after checking carefully, the 'new' one is a model up the line. One is a Kenmore 158.15030 and the other is a Kenmore 158.16520. The second arrived with a full attachment case and cam set. I can't wait to see if it sews as well as the other. The first green Kenmore (16520) runs smooth and quiet and it sets a delightful stitch. It's a joy to sew with and not very unlike the Necchi BU. It will be interesting to see if the 'better model' can out perform the so-called 'lesser' one. I really do doubt it, but we will see.
Finally, and perhaps almost prophetically... the first 15-91 arrived with a second all-black machine. It's beginning to feel ominous, as if the portends are warning me. I always said that if perhaps I had a chance to play with a 15-91 and a Pfaff 130... that I might have to move on from sewing machines to something else.
So, of course, they arrived together.

I get the feeling though, that this is going to be a whole new learning curve. The number of oil points from the operators manual are astounding, and the machine's hand wheel is very stiff. This is going to take awhile, but I believe it's going to be worth it. At least I imagine it's going to be worth it. It certainly is a marvel to behold!
This is not my machine. It's owner is betting I can get it going. They have some funds wrapped up in the piece and I agreed to take it on for the experience. It's definitely going to be something new - and I'll let you all in on the experience as it happens.
I just love your narratives of the machines! I did fix 2- 15-91s that had bare wires, but the electrical stuff took me so much longer and so much to read up on. Both did get going. I have not had any machines show up for a while. I am cleaning a friend's featherweight where someone ground down the inside of the bobbin case holder so it was always making a grinding sound. Why on earth? Thanks for letting me share in your adventures!
ReplyDelete